Guides
Installing the Zoovdev Photoshop plugin
Get the toolkit running in Photoshop and authorize it with your account.
0 views
Syntax
Platform team
This guide walks you through installing the Zoovdev Toolkit for Adobe Photoshop, what to do if Creative Cloud refuses to open the .ccx file, and how to authorize the plugin against your Zoovdev account.
Before you start
Check your Photoshop version
- Open Photoshop.
- Go to Help > About Photoshop (on macOS, Photoshop > About Photoshop).
- Confirm the version number is
24.0or higher.
Standard install (.ccx)
- Download the latest installer from the plugin page.
- Double-click the
.ccxfile. Adobe Creative Cloud should open and install the plugin automatically. - Restart Photoshop if it was already running.
Manual install (if the .ccx will not open)
If Creative Cloud fails to handle the .ccx file, or you do not have Creative Cloud installed, you can install the plugin manually. A .ccx is just a renamed .zip, so this is a quick fallback.
1. Rename the file
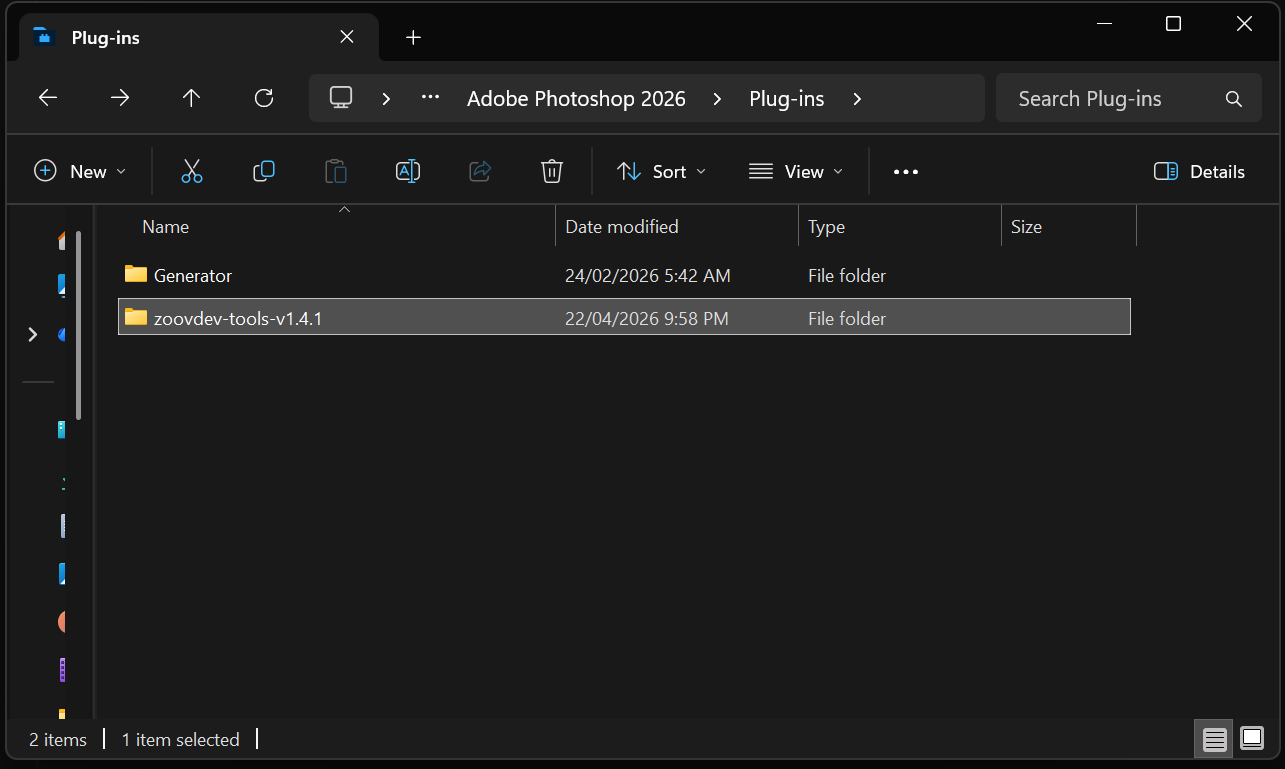
- Locate the downloaded file, e.g.
zoovdev-tools-v1.4.1.ccx. - Rename the extension from
.ccxto.zip.
2. Find your Plug-ins folder
The plugin must live inside the Plug-ins folder of your Photoshop installation.
| Platform | Default Plug-ins folder |
|---|---|
| Windows | C:\Program Files\Adobe\Adobe Photoshop <version>\Plug-ins |
| macOS | /Applications/Adobe Photoshop <version>/Plug-ins/ |
- Windows tip: if you cannot find the folder, right-click the Photoshop shortcut, choose Open file location, then open the
Plug-inssubfolder. - macOS tip: in Finder, press
Shift + Cmd + Gand paste the path above.
3. Extract into Plug-ins
- Right-click the renamed
.zipfile and choose Extract All (Windows) or double-click it (macOS). - Move the extracted folder into the Photoshop
Plug-insfolder. - The folder must be named like
zoovdev-tools-<version>(for examplezoovdev-tools-v1.4.1). Do not leave the file as a .zip and do not nest it inside another folder.
Authorize the plugin
- Launch Photoshop.
- Open the menu Plugins > Zoovdev Toolkit > Authorize.
- A browser window opens. Sign in with your Zoovdev account if prompted, then approve the authorization request.
- Return to Photoshop. The toolkit panel should now be ready to use.

Troubleshooting
| Issue | Fix |
|---|---|
| .ccx will not open / Creative Cloud does nothing | Use the manual install above (rename to .zip, extract into Plug-ins). |
| Toolkit menu is missing after install | Restart Photoshop. Confirm the folder is directly inside Plug-ins and not double-nested. |
| Authorize opens a browser but never returns | Make sure you are signed in to zoov.dev in the same browser, then click Authorize again. |
| Plugin loads but features are locked | Check your plan on the pricing page. Some features (render view, RAW imports) require Standard or higher. |
Still stuck? Open a ticket from the support page or ping us in Discord and include your Photoshop version plus a screenshot of your Plug-ins folder.